
THIS ARTICLE MAY CONTAIN COMPENSATED LINKS. PLEASE READ DISCLAIMER FOR MORE INFO.
Do you want to start a blog or niche site but are overwhelmed about how to actually start?
You are not alone.
Friends and family are often asking me how to start a site – how to buy a domain name, how to set up hosting, what to do with their site after it actually exists, etc etc. I figured it was time I built the ultimate resource to starting a blog or site to answer all of these questions.
Because it is very overwhelming the first time you do it.
The good news is that it is not hard at all. It’s just a matter of having a great resource – like this – to show you everything step by step.
“I promise you can do it.
In fact, I don’t just promise you can do it, but it only takes a couple of hours to get a site set up and looking good!
The cost is also minimal. $9 for a domain name and about $50 for hosting.
So stop making excuses and get to it!
Below you will find my step by step instructions to start a blog – or any other website. Whether you are setting up a personal blog, company website, niche site or any other type of site, the steps are the same.
This guide has been written so that you can jump between different sections if you already know how to do some parts, so don’t feel like it’s only relevant if you have never built a site before.
If you are confused about any terminology in this guide, check out the glossary here or let me know in the comments.
You will learn...
- How to choose a domain name.
- How to buy a domain name.
- Why you should use WordPress.
- How to set up hosting.
- Basic settings you need to get right for your site.
- What plugins to use and how to set them up.
- How to set up essential pages for your site.
- How to use categories and tags.
- How to add new posts to your blog.
- How to add a menu
- How to choose a theme.
- How to install a theme and make your site look nice.
Don’t be overwhelmed by all of the above steps. I promise we will go through them slowly so that you will finish this guide with your new blog!
For my example in this guide, I am going to imagine that I want to build a new site about how to start a blog. I am going to build it along side you so you can see me take all the steps you need to take and you can view the finished product.
If you have any questions or something isn’t clear – please comment below and ask! If you are unsure, probably someone else is too and this helps me to update this guide and ensure it is as useful as possible.
1. How to choose a domain name
The most important part of this whole process is choosing a domain name – the domain name is the URL of your website. For example, the domain name of this site is “digitalnomadwannabe.com”
It’s hard to change a domain name later and has big implications once you have started building your audience so it’s incredibly important to pick a name that will grow with you and your site.
The good news is that this is the hardest step so once you get past it, everything else will be easy!
Here are my suggestions for how to pick your domain name:
- BRAINSTORM. Sit down and write down everything you can think of (more about this below).
- Check if the domain names are available. I like to enter all of my ideas into a bulk domain name checker like this one at GoDaddy.
- If there are not any available that you like, then repeat steps 1 and 2 until there is.
- Once you have something that you like, sleep on it and make sure you still like it the next day.
I would not normally tell you to wait to take action but a domain name is just so important that it’s important that you are sure. Of course, if you have already been thinking about starting this blog for awhile and you are sure of your domain name, don’t hesitate and get started on the next step.
Some things you should consider when picking your domain name:
- Does it make a good brand name? Does it describe what the site is about?
- Is there any chance you will want to write about something completely different later than what you plan to write about at the moment? Will the domain name work for that as well?
- Is it a personal blog and are you sure it will stay that way? Does the domain name reflect this?
- Does it include any good keywords?
If you are building a niche site then I suggest you read more about picking a domain name here.
If you don’t know what I mean by keywords, there is an advantage to having what your blog is about in the domain name. For example, if you are writing a food blog, having “food” in the domain name could help you rank in Google later. If you write about travel, having “travel” in it will help.
The downside of this, though, is that it tends to make it harder for you to rank in Google for other niches. So if you write about food now and call your site “JasonsFood.com” and then want to write about travel later, you will be at a disadvantage.
I regret A LOT that my travel blog called WheresSharon.com. When I chose it, it was just a personal travel blog. I had absolutely no idea that it would ever be my business or that I would ever write about travelling with kids. The worst part is that it was originally RoamingThePlanet.com which I wish I had kept now (for a laugh, you can actually see my first reincarnation of my travel blog here – the domain name now looks like it is used as a PBN!!).
There are some good points to my domain name – it can move with me and my stages in life so it would still work when I am writing about travel without kids. However, I want to grow this site into a resource site rather than a personal blog and having my name in it does not work for that.
This process can be hard as it’s hard to judge what you might want to do with your blog in five years’ time when you don’t even have a blog yet! I just bring this up as I don’t want you to make the mistakes I did.
I recommend you use a “.com” domain name. It is by far and away the most popular and (I think) looks most legitimate.
The only exception to this is if you are sure you want to build a country specific site. In this case, I would consider buying a “.com.au”, “.co.uk”, etc. Be sure you only want to gain readers from that country though and I would recommend buying the “.com” version of the domain name as well.
Choosing my domain name
As I said above, I am building an example site to help guide you through this process. My site is going to be about how to start a blog!
I wanted a domain name that could grow to include lots of information about starting a site and perhaps have courses or ebooks about how to get started.
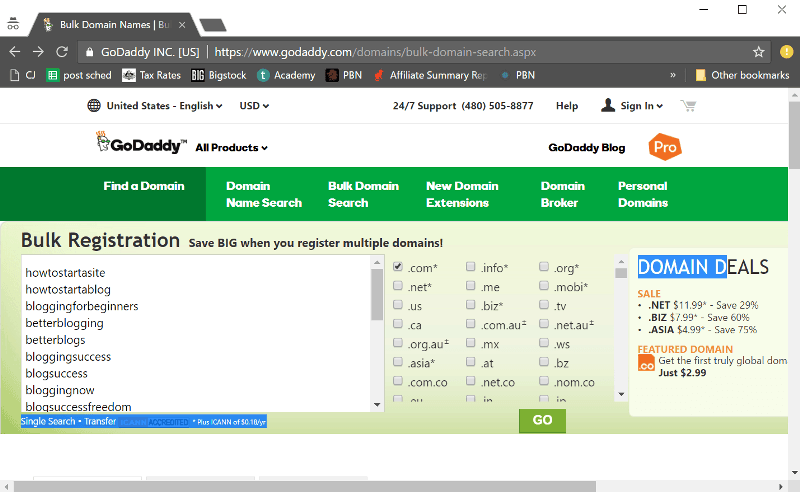
I brainstormed many ideas then I put them into the GoDaddy Bulk Domain Checker. Most were taken but there were a few that were fine. Since I want the site to be for a global audience, I only searched for “.com” domain names.
I decided to go with buildblogfreedom.com.
The good news is that the hardest part of building a blog is over once you reach this point!
2. How to buy a domain name
Buying a domain name is incredibly straight forward. In the video below, I am going to demonstrate how to buy a domain name with my favourite registrar, NameSilo.
I like NameSilo as they are cheap and simple. The best part is that they don’t screw you over when it is time to renew your domain. The cost is the same and privacy protection stays included.
Other popular options are Namecheap and GoDaddy. GoDaddy is usually very cheap on sign up so this is a good option if you are on a strict budget.
It’s also often possible to get your domain name for free when signing up for hosting. I don’t do this as they tend to screw you over on renewal as well and it makes things more complicated if I want to change hosts.
They also often charge for privacy protection anyway and this can cost as much as signing up at NameSilo. It is a good option if you are on a budget or want to keep things as simple as possible. If this is the case, skip over the rest of this step.
I highly recommend you get privacy protection for your domain. If you do not then this means that your personal details are available for everyone to see – all anyone needs to do is type in your domain name at whois.com and they can see your home address!
The easiest way to demonstrate buying a domain is to show you me buying my new domain name below…
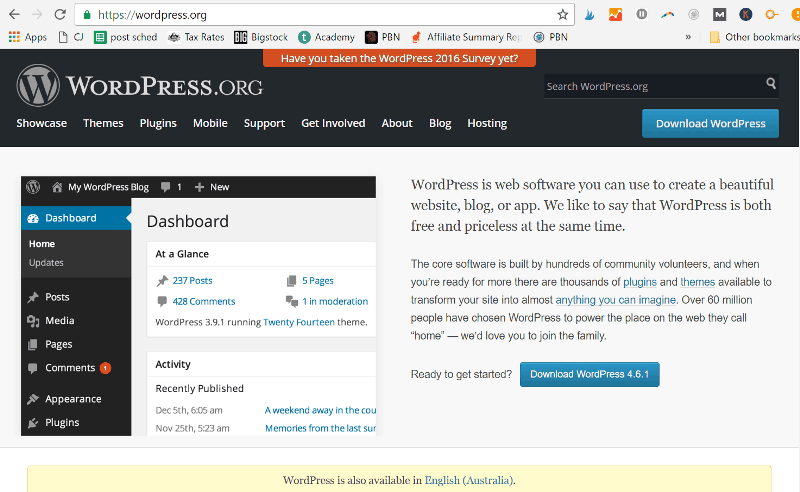
3. Why you should use WordPress
WordPress.org is not the only way you can set up a blog but it is a very popular one – in fact, it’s estimated that 20% of sites on the internet use WordPress!
This is because it is simple to use and doesn’t require any technical knowledge. It’s also quite powerful and the popularity means there are a ton of plugins and themes available (more about these below) to make it even easier! The best part, though, is that it’s free!
I use WordPress for all of my sites and they all look quite different and do different things.
There are other options including some free ones where you don’t need to set up hosting. Two of the most popular ones are WordPress.com and Blogger.com. I have used both. They are ok if you are not fussy about how the site looks and works and have no plans to ever promote your site or use it as a business.
However, if you have any plans at all to grow your site to any type of business or want to attract readers that aren’t your family then you really should avoid these options.
There are rules about how you can monetise on some of these platforms, you don’t have complete freedom with how you set it up and you are far less likely to get traffic from search engines – how often do you see a site in a search engine that is from one of these platforms?
I literally went from 0 search traffic to a lot when I moved my travel blog from Blogger to WordPress.org (or self hosted WordPress as it’s often called to distinguish it from WordPress.com). I wish I had never been on Blogger in the first place as moving was annoying.
It also looks far more professional if you want to work with brands if you own your site.
At the very least, buy your own domain name to use on one of these sites so you at least own the name of your site.
4. How to set up hosting
Setting up hosting is probably what worries people most when they go to set up their own site. It really is straight forward though!
There are many hosting options – some good, some not so good.
When starting with a new site, the average price per month for a good host is about $4 per month.
I use A LOT of hosts as I have many sites and need to spread them around for various reasons (more about this in my niche site case study updates).
The host I recommend most is SiteGround. The price is great and the support is great. The best part, though, is that SSL certificates are free. This is the only good host I know of with hosting in this price bracket that does not charge extra for this. More about this below.
Below I have a video of exactly how to set up hosting in SiteGround. However, if you want to look around, some other hosts I use and personally recommend are:
If you need a cheaper alternative, I was able to get hosting on iPage for $2 a month.
The cheapest plans on each of these are fine when starting out.
You will usually have to sign up for at least a year to get cheap prices.
Why do you need a SSL certificate?
In very simple terms, a SSL certificate helps secure your site. It means that your website address will show up with the “S” part in the http. eg https://www.digitalnomadwannabe.com instead of http://www.digitalnomadwannabe.com.
It will also show up as being secure in the address bar of your browser. If you look at the address bar right now (where the website address for this site is), you should see some type of icon to show it’s secure. In Chrome, this is a lock to the left of the address.
In my opinion, for a simple blog, a SSL certificate should not be required. HOWEVER, Google is moving towards making this basically compulsory. They already give an advantage to sites in search results that are secure.
In 2017, they plan to start showing sites that do not have a SSL certificate as insecure in Chrome browser. This means that people visiting your site could get a warning that your site isn’t secure when they visit it which could potentially turn off many readers.
Adding a SSL certificate later is a pain and means that you are basically changing your website address. For this reason, I highly recommend that you start with https from the beginning.
I have detailed instructions on how to do this below. First of all, you need to actually set up your hosting.
How to set up hosting – step by step
The following video will show you exactly how to set up hosting for your new domain name using SiteGround.
Click here to see the hosting packages and prices at SiteGround.
If you have any problems at all, SiteGround has live chat which can help you or you can ask in the comments below.
Setting up Nameservers
If you did not buy your domain at your host then you need to set up your nameservers now. This only takes a minute.
Before you set up your nameservers. You need to find them. This is how in SiteGround:
The following video shows you how to set them at NameSilo. If you used a different site to buy your domain, the process will still be similar so it is still worth watching this.
Now, you should set up the SSL certificate for your site.
This step is not compulsory but I do highly recommend it.
Setting up SSL certificate on SiteGround
You can watch this video to see exactly how and the step by step instructions are below.
- Log into SiteGround.
- Go to My Account tab.
- Click on “Go to CPanel”.
- Click on “Let’s Encrypt” in “Security” section.
- Under “Install new Let’s Encrypt Certificate:”, select your domain name and enter your email address. Click “Install”.
The certificate is installed.
The next step is that you need to set up a redirection so that people who come to your site via the “http” version or your domain name end up at the “https” version.
- Go to the CPanel (can follow steps above).
- Click on “File Manager” in the “Files” section.
- A popup will come up. Click “Go”.
- Select the file called “.htaccess”.
- Click “Edit” on the toolbar.
- Click “Edit” on the popup.
- Go to the first line in the file. Click enter (so that all the text moves down and there is a blank line at the first line).
- Copy and paste the following code in the top line:
<IfModule mod_rewrite.c> RewriteEngine On RewriteCond %{HTTPS} off RewriteRule (.*) https://%{SERVER_NAME}/$1 [R=301,L] </IfModule> - Click “Save”.
- Click “Close”.
There is one final step. Go to the “Settings” page when logged into the admin part of your new site. You will see a field called “WordPress Address” and “Site Address”. For both of these, add the “s” to the http part of the URL
That’s it! Go to your site and check that it works by entering in your domain name with the http in front. It should redirect to https with the rest staying the same.
For example, if you type in “http://www.digitalnomadwannabe.com” in your browser, it should go to “https://www.digitalnomadwannabe.com”.
And you’re done! You have a site! Congratulations!
The following video will give you a quick introduction to WordPress and your new site. Don’t worry – I will share more information about how to get things working and looking good in the rest of this guide.
5. Basic settings you need to get right for your site
Next, there are some settings in your WordPress site that you should adjust to get your site working well and to set it up for future growth. I describe them all in this video.
Mostly, you can worry about these things later, but it is very important you consider changing the permalinks setting right now if you want to attract search engine traffic to your site.
6. What plugins to use and how to set them up (including how to do backups)
A plugin is a piece of software that adds some functionality to WordPress. Basically, you use plugins to get your WordPress site to do or show different things.
This might sound complicated, but it’s not at all. In fact, plugins are part of the reason that I am such a huge fan of WordPress.
There are so many plugins out there to do everything you could want on your site. Many are free and the ones that are not are usually very cheap.
Plugins are super easy to add. Exactly which plugins you need are going to depend on your site and what you want to do, but there are 5 free plugins that I think are good for everyone. There are:
- Akismet – a plugin that filters out spam comments (trust me, your site will get lots of spam comments)
- Yoast SEO – a plugin to make your site more search engine friendly
- Duplicator -a plugin to do backups
- Contact form 7 – a plugin so you can make a contact page for your website in seconds
- WP Smush -a plugin to compress images so your site loads faster (a very good thing)
In the video below, I will add these plugins and show you how to set them up. After watching this, you should also know how you can add plugins in future.
In future, whenever you wish your site would show something or do something , do a search for a WordPress plugin that will do it for you – it probably exists! And you can usually add it doing the same process I show you in the video above.
7. How to set up essential pages for your site.
There are basically two ways to add content to your website – they are “pages” and “posts”. Either one will create a new page on your site.
There are no strict rules for when you should use a post or a page. My recommendation is that when you want to add a page that will be something that you add to menus and navigation of your site – make it a “page”. For something that is like a regular blog post, like this article you are reading now, it should be a “post”.
The biggest difference is that posts can have categories and tags (which we discuss more in the next step) and are usually sorted in date order.
Some pages which are useful to have on your site (and nearly every site has them):
- Contact
- About
Other pages which you might want to have are a “work with us” page, a “disclaimer”, a “privacy policy” or “start here”. In the video below, I am going to show you how I made the two pages above for my new site, buildblogfreedom.com, so that you can copy and add these pages to your site too.
8. How to use categories and tags
Categories and tags are two WordPress features which are basically used to help you sort posts together which are similar.
Categories are the main way to do this with most people assigning at least one category to a post (but not normally more than two or three). WordPress will auto assign the category “uncategorized” to your posts if you don’t assign something.
You can assign no tags or many tags to your posts.
I recommend using categories and tags sparingly. This is because having many of these on your posts is bad for search engine rankings. I use them to help people navigate my site – basically to help me create useful menu items, and that is all.
For example, on my travel blog, wheressharon.com, I assign a category per post. These are usually the continent that the article is about, eg “Asia with kids”, or articles are categorised into product reviews or travel tips or accommodation reviews. On this site, I use categories to group my articles to either be about blogging, niche sites or income reports.
On wheressharon.com for tags, I add whatever country the post is about as a tag. On this site, I started adding tags for what the article was about. For example, I might add a tag “WordPress” to this article. However, I barely use tags on this site now I know it’s bad SEO. The only current exception is that I am grouping all my niche site case study 2 posts with a tag by the same name.
I use all of these tags and categories only because I want my readers to see my posts grouped in these ways. For example, someone coming to wheressharon.com may only be interested in my Thailand posts because they are planning a trip there and so a tag based on this destination makes it easy for them to see everything in one spot.
It’s useful at this point to think of at least a few categories and to add them, but otherwise you can worry about all of this as you add more and more posts to your blog. It’s very very easy to add categories and tags to your site.
To think of some categories for your new site, think about what you are going to be writing about. What is your blog about? How do your posts vary?
For my new site, buildblogfreedom.com, I have decided I am going to have posts that fit into three categories:
- building a blog
- social media
- making money from blogging
I am also going to add a couple of tags for demonstration purposes. Watch how to do all this in the video below…
9. How to add new posts to your blog
Posts are articles on your blog. They are the backbone of any blog and you will no doubt spend more time adding new posts to your blog than doing anything else in WordPress.
In the video below, I am going to show you how to add new posts. I will also show you how to edit your user profile so that your name appears as the author on your posts.
10. How to add a menu
Menus are usually the main way readers navigate around sites, and they are super easy to add in WordPress.
How many menus you can add and where they are located on your site depend on your theme (we will discuss themes soon!). I have not seen a theme yet that doesn’t have at least one menu and doesn’t allow you to add multiple levels.
By multiple levels, I mean when you go to a site and you select, or mouse over, an item in the their menu and another menu appears. For example, on this site if you mouse over “Blog”, a new “menu” appears with “Blogging Tips”, “Niche Sites” etc. This is called another “level” of a menu.
This site has two menus – you can see one at the top and one right at the bottom of the page.
In the video below, I will show you how to add a menu to your site. You can obviously edit this at any point. You will probably want to as you add more content to your site.
11. How to choose a theme.
A theme is a piece of software you add to your WordPress site which will decide how your site looks. Choosing a theme is one of the biggest decisions in setting up your site.
A great theme will make your site look professional, attract readers and keep them on your site.
A bad theme will stop anyone from ever spending time on your blog.
These are the steps I follow to find a theme:
1. Consider how I want my home page to look
A home page is the most important page on your site as it is the one most people are going to see. You want a great looking home page which makes it easy to navigate around your site so your potential readers stay on your site and look around.
Home pages on themes vary a lot and I would say one of the most important considerations is to pick a theme that will let you easily set up your home page to look the way you want.
I grab a piece of paper and draw how I want my home page to look like. Don’t worry, you don’t have to make it look pretty! It just has to be a basic design of where you want a logo, menu, a post list or if you want some static text etc.
I recommend looking at other sites and blogs which are on similar topics and studying their home pages. What do you like? Don’t like? Use this to help you design your own.
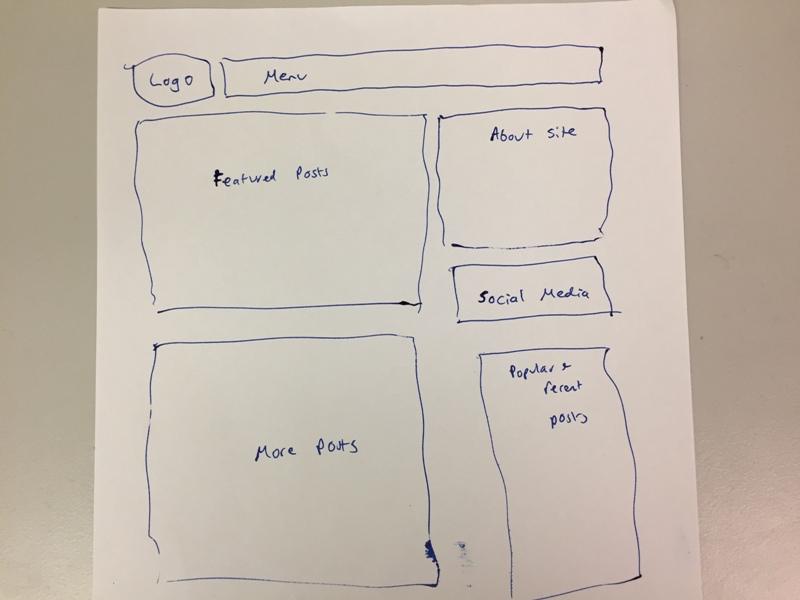
My design for my home page – it doesn’t have to be pretty!!
I then refer to this when I am looking through themes.
2. Consider any extra functionality I want for the site
You can always add extra functionality to your site using plugins, but it’s so much nicer if it just comes with your theme.
A big example of something you may want is a theme that displays reviews, especially if you are building a niche site. Some themes have this built in and it makes it so much easier and prettier when you come to write reviews.
Note down anything special you would like your theme to do.
3. Consider how photo driven my site will be
Something you will notice when you are looking at themes is that some give a very prominent place to photos.
If you are a great photographer and photos will be a big part of your blog then these are great themes to pick. If you are not, stay away! They might look beautiful when you look at the demo, but it won’t look so good when you add your own photos.
4. Look at other sites to see if I can copy their theme
Looking at other sites that you love in your area is a great way to find a theme. There is a reasonable chance that the sites you love are on WordPress and, if they are, a good chance that you can get the same theme.
To check, go to a site that you like and view the source. How to do this varies slightly between browsers. In Chrome:
- Right click on the page
- Click “View Source”. The source html will open in a new window/tab.
- Search for the word “theme”. In windows, this is Ctrl+f
- If it’s a WordPress theme, you will find something like this:
http://www.wheressharon.com/wp-content/themes/jupiter-child/style.css
(this is directly from my travel blog.) - The “wp-content” part of the above tells you that this is a WordPress site. the “jupiter-child” part tells you the theme part. Now, if the theme says something like “child”, remove this part and you are left with the theme name – in my case, Jupiter.
- Do an internet search for “Jupiter WordPress theme” – naturally replacing Jupiter with whatever theme name you found.
- If it’s one that you can get for free or buy, you should be able to find it.
5. Look for themes
If I can’t find a theme using the above step, I do a more general search for themes. The sites where I buy my themes are:
- Thrive Themes – I LOVE these themes. Simple and powerful. This site uses a theme from there.
- My Theme Shop – some great themes especially if you are looking for review themes.
You can find many themes on the WordPress site and this is the place to look for free themes.
Make sure you check out the live demos to get a good idea of how they look. Make sure you also see how they look on mobile and tablets as well since A LOT of traffic today is from devices other than computers.
There are many free themes and many paid ones. I personally never use free themes on my main sites anymore. I find them too hard to edit without enough settings for me to play with. They usually don’t look anywhere near as good as a paid option, aren’t as flexible and are far less likely to offer support or be updated regularly.
When you are starting out, a free theme may suit your needs and budget just fine. However, I would suggest re-reading this section of this article when you decide to get more serious about blogging and purchase a paid theme.
The bigger your site gets, the more painful it is to swap themes, so it’s a good idea to be very happy with your theme before you get to the point of hundreds of posts. You also don’t want to be relying on a theme that people might stop updating.
If you are buying a theme, you need to buy it and download the zip theme file.
If you are getting a free theme, you don’t usually need to download it.
12. How to install a theme and make your site look nice
Installing a theme is super easy. I will show you how to do it in the video below.
You will notice I have added some more (empty) posts. I did this to help illustrate how a theme can look and how to set up a home page.
Exactly how to edit your theme to make it look super nice will depend on your theme – they can work slightly differently. In the following video, I will show you how I made changes to my new site, buildblogfreedom.com, to make it look good. This video also includes what a widget is and how to edit them.
The final thing you may want to think about now is creating a logo or banner for your site – they can make a site look so much better.
An example of this is the one on the top left of this page. On wheressharon.com, you can see an example of a banner that goes across the screen.
Your theme will determine how big you need your logo or banner to be. It usually tells you what size it should be in the theme settings or on the “customize” page. If it doesn’t you may need to experiment with different sizes until you find what looks good.
If you feel comfortable making your own logo, check out Canva. It’s a great free tool to do this type of thing.
If you are on a low budget but don’t want to do it yourself, you could get one made in fiverr.com.
Once it’s made, you usually just add it using your theme settings or customize screen – I show you how in the video above.
That’s it! Congratulations, you are now a blogger! And a proud site owner.
If you have followed all of these instructions, you should have a great looking site and be feeling confident that you are all set to add new content.
As you can see from looking at the demonstration site I built while creating this article, http://www.buildblogfreedom.com/ (note this no longer exists), it is very quick and easy to create a great looking WordPress site.
I suggest that next, you move on to reading my introduction to SEO. It’s a great article to read when you are starting out with blogging. You may also find my guide to starting out in social media useful.
Please comment with all your questions below!
Find more posts on blogging fundamentals here.
Disclaimer: This article contains affiliate links. If you make a purchase after clicking one, I may receive a small commission at no extra cost to you. Using these links is the best way to thank me for my help. Thank you so much for supporting this site.
