
THIS ARTICLE MAY CONTAIN COMPENSATED LINKS. PLEASE READ DISCLAIMER FOR MORE INFO.
All the big bloggers talk about the importance of email lists and it is easy to see why. It is access to your readership that you own. Google may deindex you tomorrow, Facebook may cease to exist, but you will still have your own email list.
Not only that, but these people have chosen to follow you. They want to hear from you. This also makes them potentially very good customers.
I have always had an email sign up form on my blogs. Initially, I only had a sign up form in my sidebar and it did nothing.
At the point where I changed this, at the start of 2015, I only had about 100 subscribers for my travel blog. Despite the fact that I was getting over 50,000 page views per month to my blog.
I then did the tasks listed below to start actively trying to convert casual readers on my site to subscribers.
At the time when I first published this tutorial, in March 2015, I had gone from 100 in total after years to gaining 10+ a day which is not huge, but it was a MASSIVE improvement especially as I am only targeting a subset of people who land on my site.
I only took about a day trying to improve that number, as I worked on optimising it, it grew even higher. My conversion rate on this site, where I put a big focus on it, is much higher.
Some posts have 10% of people who land on the post, subscribe to my email list.
10%!
Imagine if you had a way to contact 10% of people who landed on your site and to encourage them to keep coming back. Think how powerful that is.
I started putting a much higher priority on building an email list for Where’s Sharon (my old travel blog) when I decided I wanted to significantly increase my passive income on my blog. What better way to do this than to collect subscribers and put them through an autoresponder series which leads them to posts that can make me money (and, of course, help them at the same time).
On Digital Nomad Wannabe, I have a strategy to grow subscribers for every single post that I write. That’s how important it is to me and how valuable I find a good email list.
Even if you don’t have a plan of how to use your email list yet, it is still better to put some effort into building this list right now. You will be thankful at some point soon! I wish I had started sooner. At the very least, it will help supply a ready steam of traffic to your site.
If you do not have an email marketing service set up yet (a service to store your email list and send them emails) or you are not happy with your current provider, check out my article about picking the best one – I tried 4 different services!
You will learn...
- How to figure out your target market
- How to create lead magnets and content upgrades to attract your target market
- How to create a resources page for your new lead magnets and content upgrades
- How to increase opt-ins with:
- Pop ups
- Sidebar, footer and end of post opt-in boxes
- Opt-in links
- Inline forms
- Feature boxes
- Summary of opt-in conversion rates – which opt-in works best!
- Advanced tips for getting serious about list building
Follow all these steps, and you will be gaining more subscribers as well.
Throughout this tutorial, I will show you what I have done and my opt-in rates for each approach. I have done all of these steps on Where’s Sharon.
This tutorial was originally published in March 2015 and the data contained is from that period. It is still just as valid. I updated it as necessary and added a section of advanced tips for what’s working for me on this site right now.
1. How to figure out your target market
As with all things blogging, you are going to have a hard time if you try to appeal to everyone. Before you start this process, ask yourself who do you want on your email list?
It is easy to get caught up in chasing numbers but try to avoid this. It may sound impressive to have 10,000 subscribers on your list but does this matter if none of them ever click on a link? You want people on your list who care what you have to say and will basically spend money on your site, whether that’s through affiliate links, buying products or using your services.
What I’m doing
For my travel blog, I specifically want to target families who are planning to travel. I want people who are still in the process (or haven’t started yet) booking and buying equipment. These are the people who are going to make me money, so these are the people I am targeting. They are also the people that it’s easiest for me to help.
For this site, I am targeting:
- Bloggers who want to take their blog to the next level
- People who are interested in building a niche site
- People who want to improve their SEO
2. How to create lead magnets and content upgrades to attract your target market
A lead magnet is something you will give away in return for someone subscribing to your site.
A content upgrade is the same thing, but it is specific to the content of a post (or set of posts or a category) and is giving the reader additional content on that topic in return for subscribing.
Both of these are highly effective ways to gain subscribers.
What you need to remember when creating lead magnets and content upgrades is that they need to target your ideal subscriber (see point 1 above).
You could offer a cool lead magnet that gets you lots of subscribers but if they are just going to unsubscribe afterwards or never open one of your newsletters then what is the point?
Your lead magnets and content upgrades need to seduce those readers that you most want on your list. You need to:
- Brainstorm a lead magnet that will appeal to your target market
- Go through your top posts or categories and think about content upgrades for each one that will appeal to your target market.
- Create the lead magnets and content upgrades.
You should not need too much time to come up with something good. They do not need to be overly complicated. Just something that will help out the average reader in your target market. You want a quick win for your reader.
What I’m doing
For my travel blog, I created the following, all in PDF format:
- “10 biggest tips for family travel” as a site wide lead magnet
- “The Ultimate Checklist of Things to Do in New Orleans with Kids” content upgrade for my New Orleans post which is the most popular one on my site. The post attracts many readers who are not parents thanks to the keywords it ranks for and the pins that are floating around Pinterest, so I wanted to ensure I just attracted families with my upgrade.
- “The Ultimate Checklist of Things to Do in Taipei with Kids” content upgrade for my posts about Taiwan.
- A PDF version of my ultimate guide to Bali post. This is a super long and informative article.
The checklists include everything I could find via research that there is to do in those cities with kids, rather than being limited to what we did.
For this site when I first started working on growing my subscribers in 2015, I created a lead magnet for each category of post, since the categories are quite different and I imagine I have readers that are only interested in my income reports or my blogging tips or my nice sites.
I created:
- “10 ways that I increased my page views from 0 to 12,000 in 3 months” – this is my blogging category content upgrade and is actually just a PDF version of an article I posted on my travel blog.
- “Finding Quality Expired Domains Cheat Sheet” – I created this and then had someone on Fiverr format it to make it look nice. This is for my niche sites category.
- A zip file of all my income reports – this is for my income reports category.
Hopefully, these gives you some ideas. Since I first created these upgrades, I have created many more.
For Where’s Sharon, I add them to my most popular posts.
For Digital Nomad Wannabe, I make sure I have something for every post I create. It is part of my content plan and weekly work (more about this in advanced tips below).
For example, you can click here to download a checklist of the 8 Steps To Dramatically Increase Email Subscribers In One Day.
See how it works?
3. How to create a resources page for your new lead magnets and content upgrades
The next step is having a system to get all these great new resources that you have created to your new subscribers.
The easiest way to do this is just to upload them to your site and put them on your thank you page after someone signs up.
This does mean that you run the risk that someone might be able to find them without signing up, but if someone is that desperate to get access, they could just subscribe and unsubscribe anyway.
In WordPress, it is very easy to upload PDFs. Just add them as media. After they have finished uploading, go to the edit screen. If you have a SEO plugin, such as the one by Yoast, change the settings so they are not indexed by Google. Get the link to the PDF and then you can link to this from your thank you page.
If you don’t have have a thank you page yet, I suggest you create one. Most email services make it very easy to change your settings so that a subscriber is redirected to this page after they confirm their subscription.
What I’m doing
This is my thank you page on Where’s Sharon. I used to have a similar one on this site.
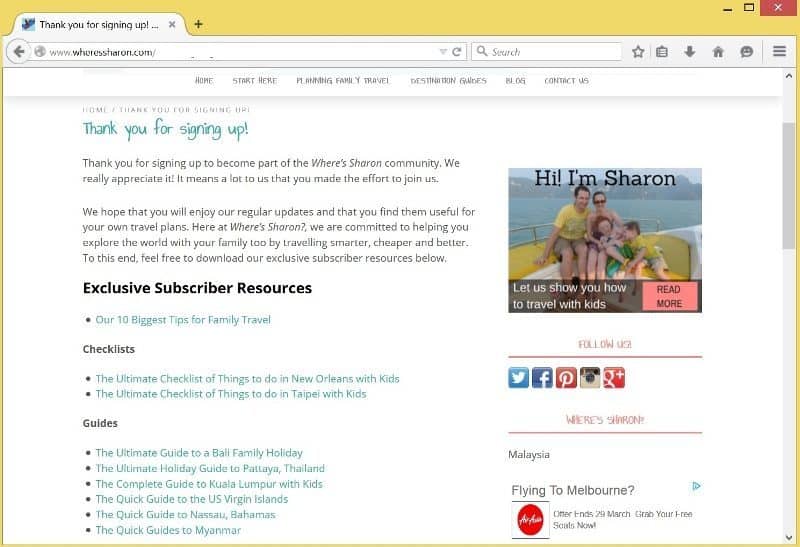
Subscriber Resources on Where’s Sharon
4. How to increase opt-ins
Now that you have created and uploaded some great resources, it’s time to tell your readers about them. I am going to go through the main approaches below and share what I have done and how you can do it yourself.
Many of these approaches require plugins. There are some free solutions, but if you are serious about list building, you should consider some paid plugins. They are not expensive, make life easier and can work very very well.
Something to keep in mind when looking at these, is that opt-ins that blend in well do not often convert as well as something that stands out – you want your readers to actually know you would like their email.
Another important aspect of increasing conversions is split testing. This means creating multiple opt-in forms for a specific location and then seeing which one converts readers to subscribers best.
The plugins I use all allow me to quickly create multiple opt-in forms for each type of opt-in and create a split test.
The plugin will then randomly show one of the opt-in forms on each load and keep track of how many readers it converted. This is incredibly useful and a very important and easy way to optimise your conversions.
You will see below that there can be quite a difference in the conversion number. Even a 1% difference could potentially be 100+ subscribers you are missing out on every month.
Pop ups
If you are not using pop ups to gain subscribers on your site then you should fix this immediately! There are many plugins to help you do this, many of which are free. They are widely considered as the most effective way to gain subscribers.
How do they work? Basically when someone is on your site, at some point a pop up box appears asking them to subscribe to your email list. It can appear based on the reader being on your site a certain length of time, them scrolling down a certain percentage on a page or the reader looking like they are leaving your site (an exit intent pop up).
You can also set how long it is until they appear again so you don’t ignore regular readers who just don’t want to sign up or already have.
Ideally, you should set these up across your site. You should use a few different ones so you can split test what design and wording will best convert your readers. You should also customise the pop up depending where on your site the reader is so that on your content upgrade posts/categories, they see a pop up offering them this upgrade in return for subscribing.
What I’m doing
I initially went with a free pop up. I tried SumoMe, PopupAlley and Scroll Triggered Boxes. They all offer much the same service, although I particularly liked PopupAlley as it offered an exit intent option and was the best looking one. SumoMe was a no go for me as it includes a link to their site which you are stuck with in the free version. You don’t want to distract your readers with links elsewhere.
My PopupAlley and Scroll Triggered Boxes (PopupAlley wouldn’t play nice with my theme on Where’s Sharon) worked better than nothing, but they were nowhere near as effective as OptinMonster.
This plugin will allow you to create as many pop ups as you like (as well as many other types of opt-in forms) and is essential if you want to take full advantage of your content upgrades – you basically want to set up different pop ups for different categories or posts to entice readers with these upgrade bonuses.
This plugin starts at $9 a month if you sign up for a year for one site and don’t have much traffic and is ultra easy to use and create great pop ups in minutes. It also allows split testing. Below you will see just how powerful this benefit can be in your quest to improve your email list building efforts.
While I do think this is the best tool, it is expensive when you are starting out if you already have a lot of traffic.
I currently use Convertbox because it has a one-off charge and I never have to pay again. However, this initial charge is high.
A good middle ground is Thrive Leads. It has a cheaper annual price.
Click here for more information on Thrive Leads.
I am currently experimenting with what pop up design works best. This is my first lot of tests so you can see what is working (or not) for me on both my blogs. I am continually trying new designs and wording to optimise my conversions as much as possible.
If you can afford to buy OptinMonster, definitely use the split testing capability. It will only take you a few minutes to set up some split tests and you can see below the difference in conversions you might experience.
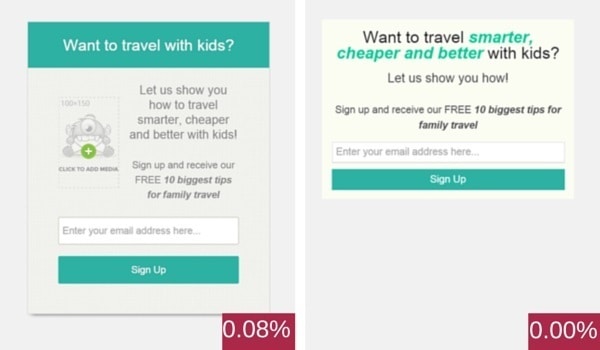
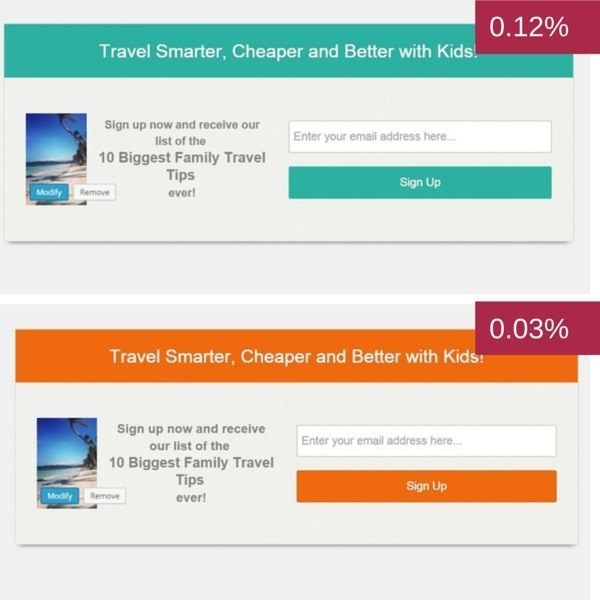
On the images below, you will find some of the different pop ups I have been split testing along with their conversion rate (how many people subscribed vs how many people saw the pop up)
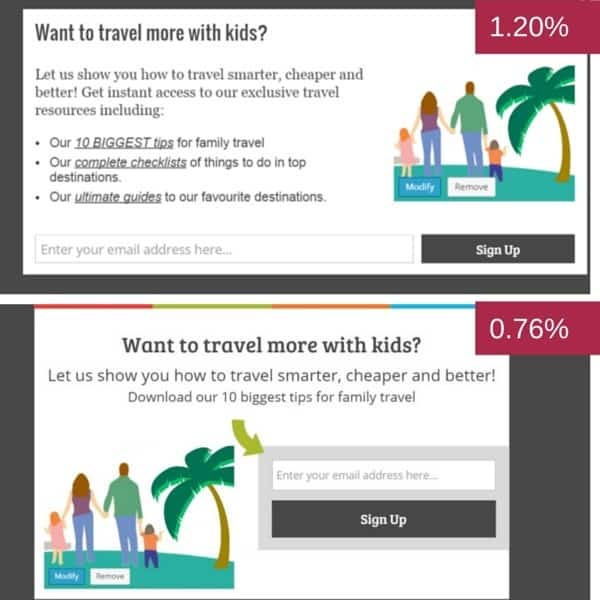
Site wide pop up on Where’s Sharon
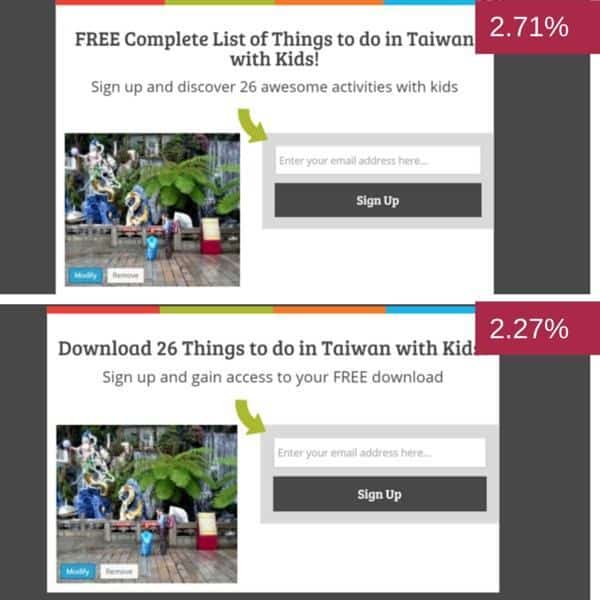
Taiwan content upgrade pop up
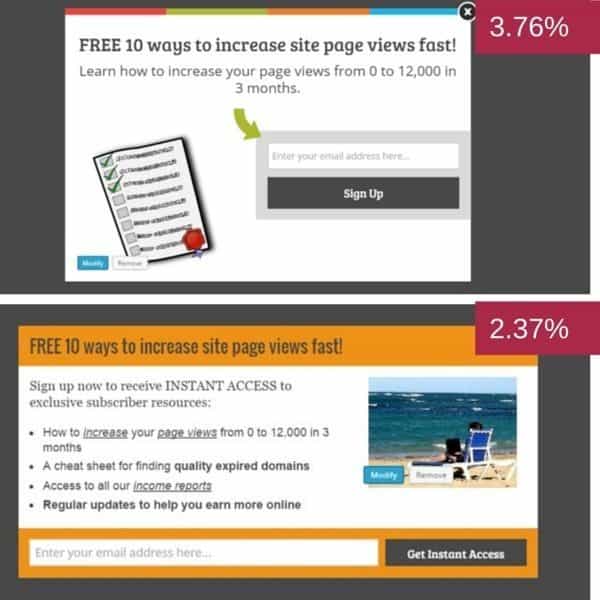
Site wide pop up on this site
FYI I am split testing more than what I am showing here. I am just showing you the differences between the best performing pop up vs the worst performing.
You can also see the power of the content upgrade here. The Taiwan pop up is performing a lot better than the general site one.
Sidebar, footer and end of post opt-in boxes
Other places that are common for subscriber opt-in boxes are in the sidebar, in a footer (which always displays at the bottom of the screen until the reader shuts it) and at the end of the post.
You can create these boxes by using forms supplied by your email marketing service. They may also produce a plugin for you to make it easier. However, if you want more flexibility about where to put them and how they look and want to set them up (including split testing) quickly and easily, all of these forms can be set up using OptinMonster literally in minutes.
What I’m doing
I have been trialing all three of these opt-in forms using OptinMonster with varying degrees of success.
Sidebar
Sidebar conversions – FYI that image on the left does not show up on the site
I was not surprised that the sidebar form does not convert well – it is the one thing I had on my site for a year with only about 50 conversions. I did have this form at the top of my sidebar, but now I have seen how badly it is converting, I removed it.
I don’t view these conversion rates as being worth that precious real estate.
Under the post
Under post conversions
These forms show up directly under the posts. I was surprised they were so low. Hopefully, I can increase them with some further optimisation. On this site, they convert at 0.66%
Footer

Footer bar conversions
The footer bar shoots up at the bottom of the screen until the reader clicks the “x” to remove it. I personally think it takes up too much real estate, but I hate to make decisions based on personal opinion so I gave it a go. The rates were not very high, so I have decided to remove it.
On this site, the conversion was 0.37%
Opt-in links
Opt-in links are basically a link within a post that, when clicked on, will display a pop up box for readers to subscribe. This is a highly effective way to get readers to subscribe, especially for content upgrades. People feel compelled to subscribe once they click on the link.
When I first wrote this article, I used a plugin called Optinlinks. I have since stopped since OptinMonster and Convertbox now includes this functionality. They are easy to set up and track. Here is an example:
What I’m doing
I have had enormous success with using opt-in links to entice subscriptions with my content upgrades.
At present, these links are clicked on by 14.31% of people who view these pages on this blog. Of these, 75% are subscribing to my email list. This means that these links are converting at 10.7% which is far higher than the pop ups.
It did take some split testing and optimisation to get it to this point.
On Where’s Sharon it was not as high but still it was over 6% which is a great result.
Inline forms
Inline forms are just that – subscribe forms that are within the post content. These are popular on “About” pages but not often used elsewhere. Here is an example…
You would use these forms in the same way as this, although you wouldn’t normally introduce them!
Ugly forms can convert well. The best way to create them is to use web forms that come with your email marketing service. They usually have some nice ugly versions for you.
What I’m doing
I created one like the one above using my email marketing service, ActiveCampaign. Check out your own email marketing service for instructions on how to do this.
I converted at 0.83% for inline forms. I added these to key posts, including my about page, and use them to market the content upgrades as well as the overall site lead magnet on Where’s Sharon.
Feature boxes
A feature box is a big form at the top of a page or post. I was using them on my home pages. This can be an easy way to get a reader’s attentions. You can put them just on key pages or posts or all through your site.
The easiest way to create these is with a plugin called Optin Feature Box by PlugMatter. This will allow you to create your own feature boxes and choose where you want to display them and which one. You can also perform split tests with this plugin.
What I’m doing
I was using this plugin on both my blogs to display on the home pages, tags and categories. On this site, they are converting at 0.80%. On Where’s Sharon, my split test has found quite a difference in my conversion rates:
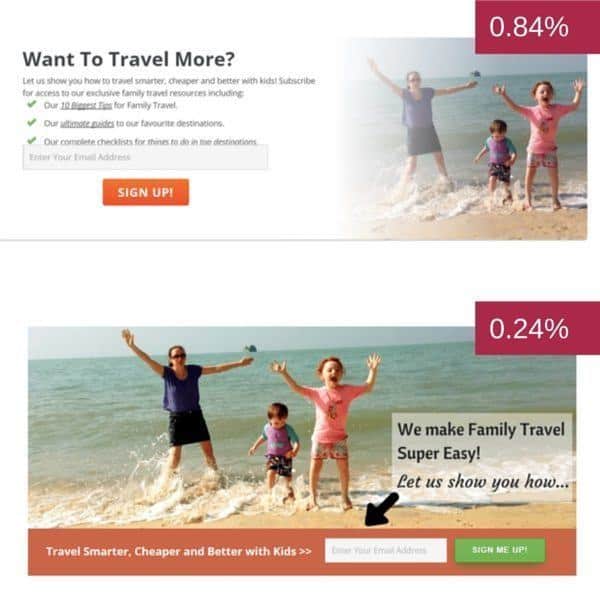
Feature box conversions
I think there is a lesson to be learned in this. I spent a lot of time making that second feature box and designing different ones to make it responsive… what a waste of time! Start by keeping things simple then spend the time later when you have a better idea if it will be worthwhile.
Updated 1/04/2015 – Just to illustrate further the importance of split testing, I now have a new feature box which is converting at 1% on wheressharon.com
5. Summary of opt-in conversion rates – which opt-in works best!
Now that we have walked through all the different ways you can gain subscribers, let’s summarise how each of these options converted for me two months after I first made these changes:
| Type of Opt-in | Best Conversion Where’s Sharon* | Best Conversion Digital Nomad Wannabe* | Plugin Used |
|---|---|---|---|
| Pop ups | 1.2% (all site) 2.71% (content upgrade) | 3.76% | OptinMonster |
| Sidebar | 0.08% | 0.32% | OptinMonster |
| Footer | 0.08% | 0.37% | OptinMonster |
| End of Post | 0.12% | 0.66% | OptinMonster |
| Opt-in Links | 8.30% | 10.7% | OptinMonster |
| Inline Form | 0.83% | ActiveCampaign | |
| Feature Box | 0.84% | 0.80% | Optin Feature Box |
*This is the best conversion rate I am getting across my split tests. I have not used every technique for long enough on this site to have figures for all types of opt-in forms.
If you add these up, that’s over 11% conversion on Where’s Sharon on posts where I have implemented everything and 17% on this site.
Think how powerful that is!
Of course, everyone has a different audience and a different blog. What works best for me may not work for you.
However, I think it’s a safe bet that pop ups and opt-in links will work very well for you as well.
I can’t recommend OptinMonster enough in making this all happen. It is one of my favourite plugins and I use it all the time. It is quick and powerful and you will be gaining new subscribers straight away.
However, if you have a tighter budget, Thrive Leads is a newer, great option with a smaller annual fee to use. Click here for more details.
6. Advanced tips for getting serious about list building
On Digital Nomad Wannabe, I have definitely found it to be true that the money is in the email list. My email list is the primary way I sell my products and I place a huge emphasis on building up my list.
I still do everything I list above, but I am more targeted about it.
Every post has a content upgrade.
When I plan my content and new blogs posts, I also plan what the content upgrade will be. Sometimes, I use an existing content upgrade (but only if it fits the new post very well). Often, I create a new one specifically for the post.
I design upgrades that will add extra value to the content. It’s often checklists, further content or a series of emails to help the reader achieve a goal, like this checklist of the 8 Steps To Dramatically Increase Email Subscribers In One Day.
This is not as time consuming as it sounds. They can usually be created in less than an hour and I then take another ten minutes to set up an opt-in link and pop up using OptinMonster. I also set up an email to email it out after the reader subscribes.
I no longer use a page on this site with all the opt-ins listed as I want to make sure I record every opt-in that people download so I know exactly what topics each subscriber is interested in. This helps me email them relevant content.
My tips for when you are ready to take your list building to the next level:
- Design content upgrades to match your content as part of your posting schedule
- Create unique pop ups and opt-in links for each new offer
- When people subscribe, send them a link to the upgrade they selected directly
- Make sure you are tagging them in your email marketing service so you know what opt-in offer(s) they subscribed for
Doing these things has not only increased my conversion rates but also has given me the opportunity to create more value for my readers. This is also a win when it comes time to sell to them.
If you have made it this far, congratulations!
I hope you are feeling inspired to grow your email list. The best thing about every suggestion in this article is that the effects are immediate – you can be gaining more subscribers as soon as you implement every improvement.
Ready to get started? Click here to download a checklist of the 8 Steps To Dramatically Increase Email Subscribers In One Day.
You can also learn more about how to get more subscribers in my podcast episode here.
Now you know how to get more email subscribers, learn what to email them here.
Read more here about my content marketing strategies and how I have hit 100,000 page views or find more posts on getting more blog traffic here.
How successful have you been at growing your email list? Do you do all of the above techniques? What is your best tip?
Disclaimer: This post contains affiliate links. If you make a purchase after clicking on one of these links, I may receive a commission at no extra cost to you. As you can see, I use all these plugins personally and very much recommend them.
